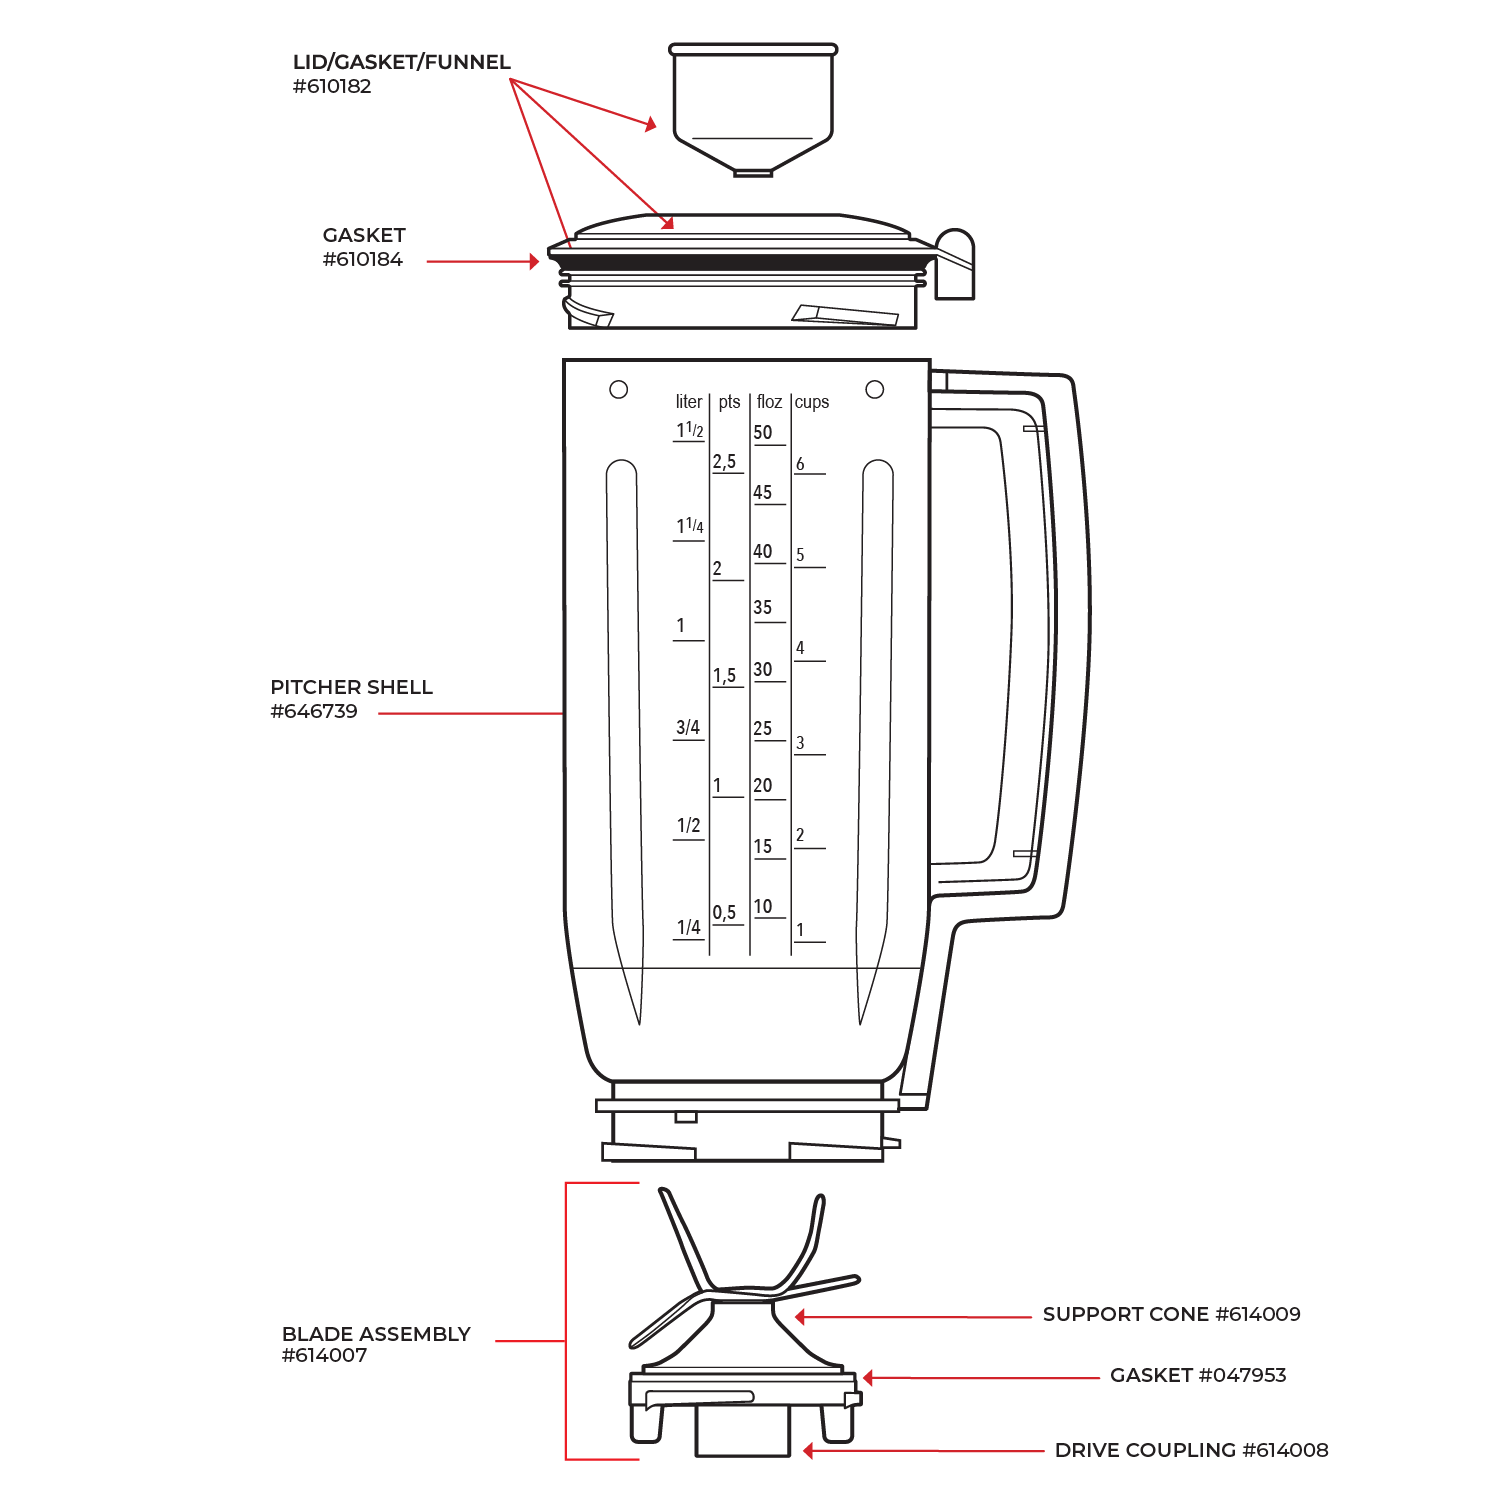
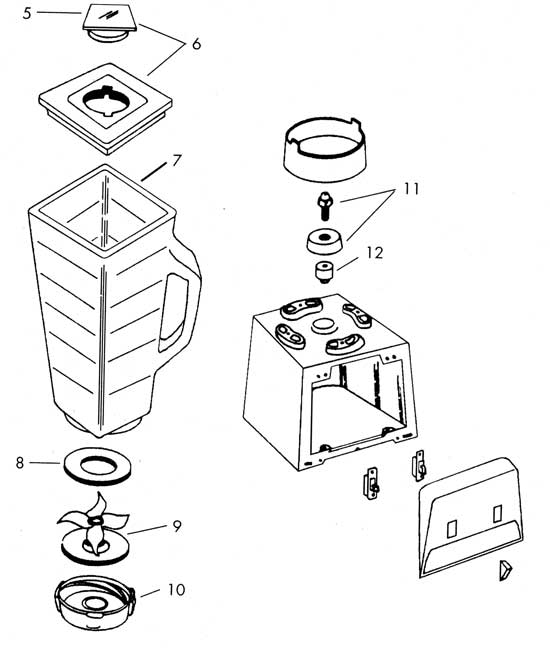
The gasket sits between the blade assembly and the jar base to seal leaks.
If you have ever asked where does the gasket go on a blender, you are not alone. I have helped many people fix leaks with one small ring. In this guide, I will show you where it belongs, how to install it, and how to avoid messes. By the end, you will know exactly where does the gasket go on a blender and how to keep your machine running like new.
What Is the Blender Gasket and Where It Belongs
The gasket is a soft rubber or silicone ring. It creates a watertight seal between the blade assembly and the jar. It keeps smoothies in and air out.
Most countertop blenders use a removable blade. In these models, the gasket sits right where the jar meets the blade housing. If you have wondered where does the gasket go on a blender with a screw-on base, the answer is simple. It goes on the blade assembly lip, then the blade assembly screws to the jar to clamp the seal.
Some premium blenders have a fixed blade. In these, the seal is built in. You will not handle a loose gasket during daily use. If you are unsure where does the gasket go on a blender like this, check your manual. The seal may be part of the blade or the lid.

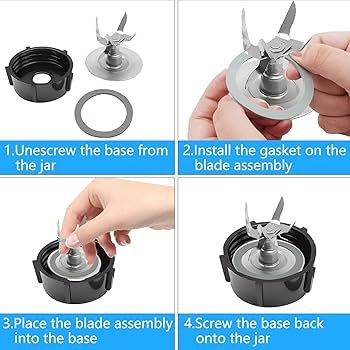
The Correct Assembly Order: Jar, Gasket, Blade, Base
For classic screw-on designs, the order matters. A wrong order is the top reason for leaks.
Use this setup for most removable-blade jars:
- Place the blade assembly upright on the counter.
- Seat the gasket on the blade assembly groove. It should lie flat with no twists.
- Invert the jar and place it over the blade assembly.
- Screw on the retaining base by hand until snug.
This is the safest way to answer where does the gasket go on a blender during assembly. The gasket must sit between the jar and the blade plate. Do not put it on the outside threads. Do not set it on top of the retaining ring.

Model-by-Model Notes You Should Know
Not all blenders are the same. A few design styles change how you handle the seal.
Countertop blenders with removable blades:
- The gasket is a loose ring. It goes on the blade assembly before the jar.
- If you see two grooves, use the inner one that meets the jar edge.
Personal blenders with cup-style jars:
- The gasket is often pre-installed in the blade collar.
- If it falls out, clean it and seat it back into the collar groove.
High-speed blenders with fixed blades:
- The seal is built into the blade mount or the jar.
- If it leaks, you may need a jar or blade replacement, not just a ring.
If you are asking where does the gasket go on a blender for a travel cup system, look into the blade cap. That is where the seal lives most of the time.

Step-by-Step: Install and Test for Leaks
Here is my simple method, learned after one very messy smoothie morning.
- Unplug the blender. Safety first.
- Inspect the gasket. Look for cracks, flat spots, or dried pulp.
- Place the blade assembly on the counter. Seat the gasket in its groove.
- Flip the empty jar over the blade assembly. Align the edges.
- Screw on the base ring by hand. Tight, but not too tight.
- Fill the jar with 1 inch of water. Set it on the motor base.
- Pulse for 3 seconds. Stop and check the seam for drips.
If you still wonder where does the gasket go on a blender during this test, look at the contact edge. The gasket must sit between the blade plate and the jar. A clean even seam means you did it right.

Cleaning and Maintenance Best Practices
Gaskets fail more from misuse than age. A little care goes a long way.
- Rinse right after use. Dried fruit pulp weakens rubber over time.
- Use warm soapy water and a soft brush. No sharp tools.
- Do not boil the ring unless the manual says it is safe.
- Let it dry flat. Do not stretch it over tall objects.
- Store the ring seated on the blade, not loose in a drawer.
These steps keep the seal soft and safe. They also cut down on smells and stains. If you ask where does the gasket go on a blender when storing, keep it in place on the blade to avoid warping.
Troubleshooting Leaks, Odors, and Noise
Leaks usually trace back to three things: wrong placement, wear, or loose parts.
If you see drips:
- Check that the gasket is not twisted or inside out.
- Confirm it sits between the jar and blade plate.
- Tighten the base ring by hand. Do not use tools.
If you smell odors:
- Remove the gasket and clean the groove. Trapped food can smell.
- Soak the ring in a 1:4 vinegar and water mix for 10 minutes.
If you hear odd noise or feel vibration:
- Make sure the jar is seated on the base.
- Check for a pinched gasket. It can make the blade wobble.
When I first learned where does the gasket go on a blender, I pushed it too far into the thread area. The result was a steady drip. Putting it back on the blade lip fixed it at once.

When and How to Replace the Gasket
Even with care, gaskets wear out. Heavy users should check them often.
Replace your gasket if you notice:
- Cracks, tears, or a chalky surface.
- Flat spots where the ring no longer springs back.
- Ongoing leaks even with correct assembly.
How to size a new ring:
- Measure the inner and outer diameter with a ruler.
- Match the cross-section thickness.
- Use the model number to find an OEM part.
If you are still asking where does the gasket go on a blender after a swap, install it the same way. It always sits between the jar edge and the blade plate in removable-blade models.

Safety Tips and Common Mistakes to Avoid
These small habits protect both you and your blender.
- Unplug before assembly or cleaning. Blades are sharp.
- Never run the blender without the gasket. It will leak and can pull in air.
- Do not over-tighten the base ring. You can warp the seal.
- Avoid harsh cleaners or oils on rubber. They break down the material.
- Read your manual. Some models have unique parts.
If a friend asks where does the gasket go on a blender, share this simple rule. It seals the joint where the jar and blade meet, never on the outside threads.

Frequently Asked Questions of where does the gasket go on a blender
Where does the gasket go on a blender with a screw-on base?
It goes on the blade assembly lip, right where the blade meets the jar. Then the base ring screws on to clamp the seal.
Can I run my blender without the gasket?
No. The gasket prevents leaks and keeps air from getting pulled in. Running without it can damage the motor or cause spills.
How often should I replace the blender gasket?
Check it every few months. Replace it when you see cracks, flattening, or leaks that do not stop after correct assembly.
What if my gasket keeps popping out?
Clean both the ring and the groove and dry them well. If it still pops out, it may be stretched or the wrong size.
Is there a different answer for where does the gasket go on a blender cup system?
Yes. In many cup systems, the gasket sits in the blade cap collar. It is usually pre-installed and should stay in that groove.
Does the gasket go above or below the blade?
In most removable-blade models, the gasket sits on the blade assembly and seals against the jar. It does not sit above the retaining ring or on the outside.
Conclusion
A blender gasket is a small part with a big job. Place it between the blade assembly and the jar, keep it clean, and replace it when worn. Now when someone asks where does the gasket go on a blender, you can show them step by step.
Test your setup with a quick water run today. A two-minute check can save your morning smoothie and your counter. Want more kitchen fix-it tips like this? Subscribe and leave your questions in the comments.