
A vacuum cup high frequency annealing machine uses induction heat to stress-relieve stainless cup parts.
If you build stainless drinkware at scale, mastering the vacuum cup high frequency annealing machine can change your line. I have set up and tuned these systems on busy floors. In this guide, I will show you how they work, how to dial them in, and how to avoid costly scrap. Read on for a clear, friendly walk-through that keeps the focus on the vacuum cup high frequency annealing machine.

What is a vacuum cup high frequency annealing machine?
A vacuum cup high frequency annealing machine is an induction heating system. It heats stainless steel cup parts fast and in a focused zone. The goal is to soften work-hardened areas and remove stress after forming or welding.
It is most used on 304 or 316 stainless steel. It targets thin walls, rims, necks, threads, and weld seams. Heat time is short. The work zone often sees only a few seconds at high heat.
This machine fits a drinkware production line. It can sit after necking, beading, threading, or laser welding. It helps keep shape, reduces cracks, and gives stable thread quality. A vacuum cup high frequency annealing machine is now a standard tool in many cup plants.

How it works: the simple science behind fast, clean anneal
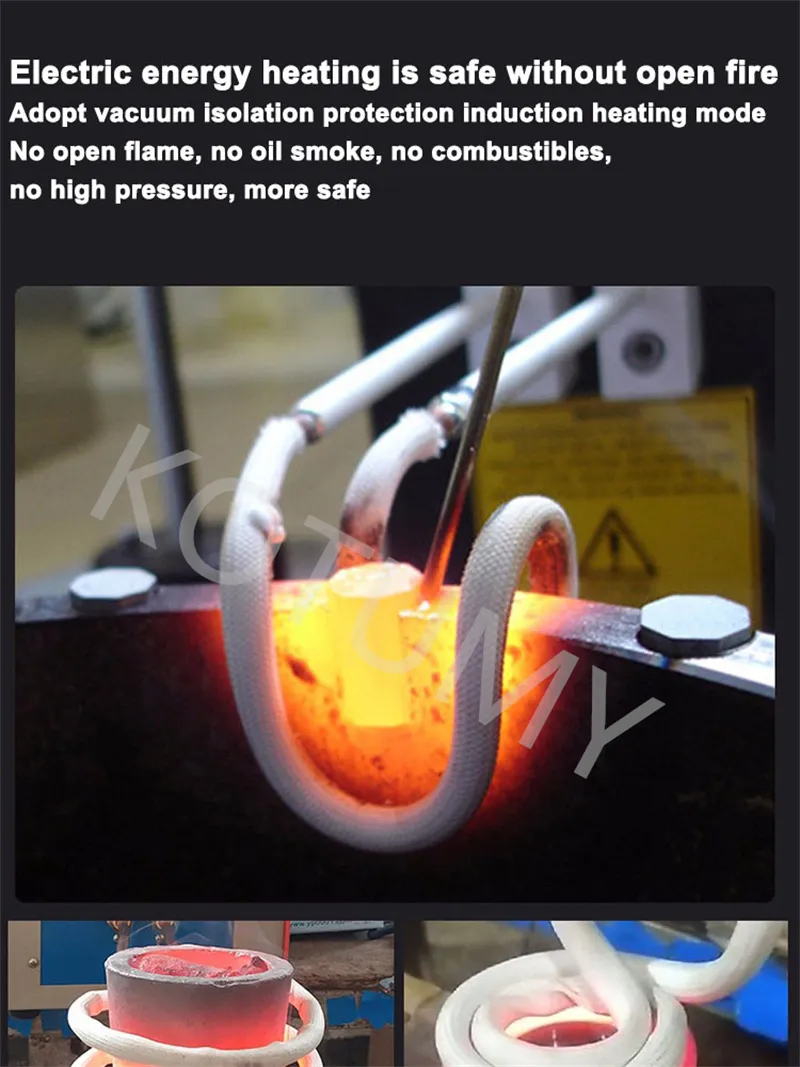
Induction coils create a high frequency magnetic field. The field pushes current into the steel surface. This surface current makes heat. The effect is called skin effect.
High frequency focuses the heat near the surface. That works well for thin stainless walls. Heat builds fast, right where you need it. The part can air cool or gas cool right after.
The control loop is tight. A pyrometer reads the hot zone. The power supply adjusts output in real time. The result is fast, repeatable annealing with little scale. This is the core promise of a vacuum cup high frequency annealing machine.

Why manufacturers choose high frequency annealing for vacuum cups
A vacuum cup high frequency annealing machine offers real gains on the line. Here are the key wins:
- Speed and takt time. Heat cycles take seconds, not minutes.
- Local heat only. You avoid heating the whole part, so less warp.
- Lower energy use. You heat metal, not air or bricks.
- Clean surface. Short time at heat means less oxidation and less cleanup.
- Stable quality. Digital control gives repeatable results shift after shift.
- Easy to automate. It fits with robots, conveyors, and vision.
From my work on cup lines, the biggest win is edge consistency. The rim and thread area stop cracking. Scrap drops fast once you dial in the coil and power.
Key components and what they do
A vacuum cup high frequency annealing machine has a few core parts. Know each one, and you can solve most issues on your own:
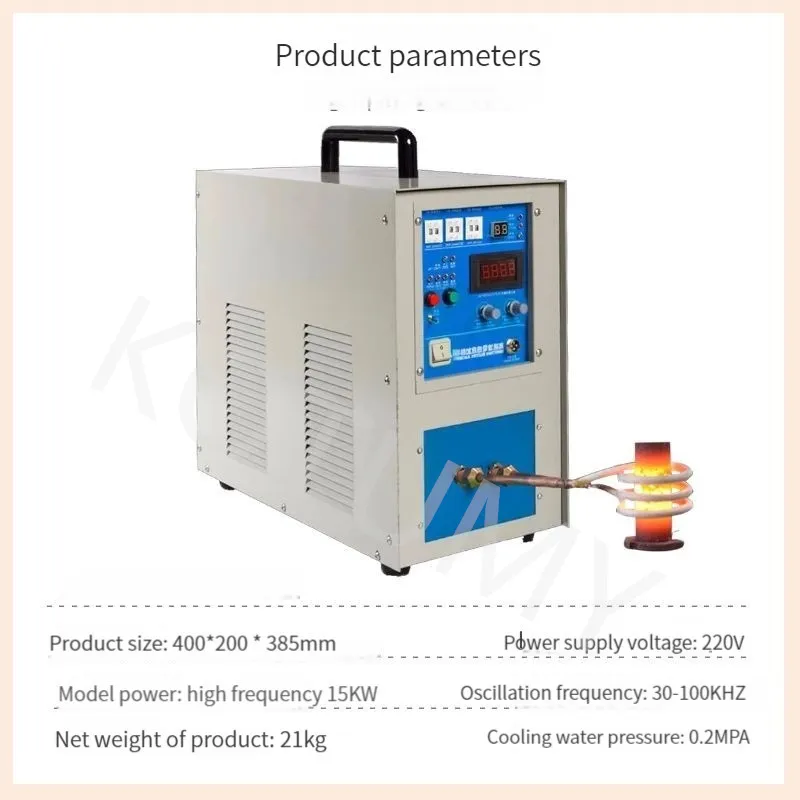
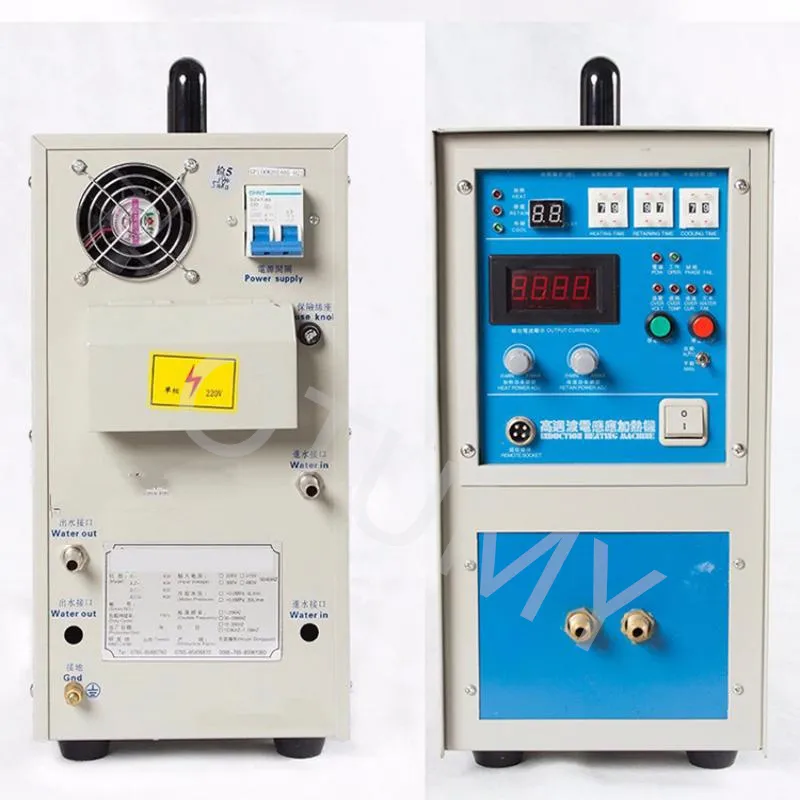
- Power supply. IGBT or MOSFET inverter, often 30 to 200 kHz. It sets frequency and power.
- Induction coil. Custom coil shape wraps the rim, neck, or seam. Copper tubing with water cooling.
- Cooling system. Closed-loop chiller for the coil and power electronics.
- Temperature control. Infrared pyrometer or thermal camera. PID control trims power.
- Motion and fixturing. Rotary tables, linear conveyors, or robot grippers.
- HMI and PLC. Recipes, alarms, and interlocks. Data logging for traceability.
- Gas assist. Nitrogen or argon can shield the hot zone. This reduces discoloration.
- Safety gear. Light curtains, e-stops, and water flow sensors.
Tip from the floor: spend time on coil design. A great coil makes a good machine feel world-class.
 temperature, time, and cooling”
style=”max-width: 100%; height: auto; border: 2px solid black; border-radius: 10px; display: block; margin: 0 auto;”
loading=”lazy”
/>
Process window: frequency, temperature, time, and cooling
To get a sound anneal on thin stainless, set a clear process window. A vacuum cup high frequency annealing machine lets you control each knob.
- Frequency. 50 to 200 kHz is common for cup walls around 0.3 to 0.8 mm. Higher frequency gives shallower heat.
- Temperature. For 304 or 316, target 950 to 1100°C for full anneal in short cycles. Many lines sit near 1050°C.
- Time at heat. Often 2 to 10 seconds, depending on wall, shape, and power.
- Cooling. Still air or light gas flow is fine. Avoid drafts that cause warp.
Use a thermal crayon test for a quick check. Back it with a pyrometer read. Run coupons first. Then lock the recipe in the HMI with limits and alarms. The vacuum cup high frequency annealing machine will hold tight once you set this up.
Common applications on a cup line
A vacuum cup high frequency annealing machine fits in many spots:
- Rim softening after beading or flaring
- Thread relief after rolling or cutting
- Weld seam stress relief on double-wall joints
- Neck area soften for final spin forming
- Post-polish touch-up where strain hardening shows
On one line I tuned, the rim crack rate fell from 6% to below 0.5%. We did this by adding a 4-second rim anneal at 1020°C. That one change paid for the system within months.

Setup and operation: step-by-step
Here is a simple way to set up a new recipe on a vacuum cup high frequency annealing machine:
- Define the hot zone. Mark the rim or neck width to heat.
- Choose or build the coil. Fit it to the part. Aim for 2 to 5 mm lift-off.
- Set frequency and a safe low power. Start short, like 1 to 2 seconds.
- Add the pyrometer and check aim. Use a black paint dot if reflectivity is high.
- Ramp power in small steps. Watch the temperature curve.
- Hold at target temperature. Keep it steady for the planned seconds.
- Cool and inspect. Check color, shape, and hardness.
- Save the recipe. Log the part ID, lot, and final settings.
Train operators to watch and listen. A smooth coil hum is a good sign. Pops or arcs mean spacing or water flow needs a check.
Quality control: how to prove your anneal is right
Good QC is simple and fast. Build these checks around your vacuum cup high frequency annealing machine:
- Visual color check on the hot zone
- Rim roundness and thread gauge test
- Quick magnet check to confirm austenitic state recovery
- Microhardness spot check on coupons
- Pull test or burst test on sample cups each shift
- Leak check after weld relief
Keep a control chart for temperature and time. If you see drift, pause and audit the coil gap and pyrometer aim. This saves a lot of rework.

Safety and maintenance best practices
Induction is safe when you keep up with care. Build a simple habit list:
- Check water flow, temperature, and filters each day
- Inspect coil for cracks, hot spots, and loose joints
- Clean the lens of the pyrometer each shift
- Tighten all lug connections monthly
- Test interlocks, e-stops, and guards
- Keep cables off the floor and away from sharp edges
Also train staff on hot part handling. The hot zone can look “cool” due to clean surfaces. Use markers or lights to show hot parts at the unload point of your vacuum cup high frequency annealing machine.
Troubleshooting: fast fixes to common problems
Here are issues I see often, with quick fixes:
- Uneven color or soft zone. Re-center the coil. Match the cup axis to the coil axis. Check lift-off is even.
- Overheating or burn marks. Lower power or shorten time. Add light gas flow. Verify pyrometer aim.
- Warp or oval shape. Reduce peak temperature. Use a rotate motion during heat. Ease the clamp force.
- Scale or rainbow tint. Increase gas shield. Shorten time at peak. Clean parts before heat.
- Random trips or arcs. Check coil insulation and water flow. Tighten all RF connections.
Keep a one-page playbook at the HMI. This helps operators fix small issues without a call to engineering. It also protects the vacuum cup high frequency annealing machine from misuse.
Buying guide and ROI: pick the right system, prove the payback
When you shop for a vacuum cup high frequency annealing machine, look at:
- Power and frequency range that match your cup sizes
- Coil change time and tool-less couplers
- Real-time temperature control with fast PID
- Data logging and recipe control
- Water system capacity and alarms
- Safety interlocks and lock-out points
- Service access and spare parts lead time
To prove ROI, measure these items before and after install:
- Scrap and rework rate in the anneal work zone
- Line speed and uptime
- Energy per part
- Labor per 1000 cups
- Warranty returns tied to rim or thread faults
Many plants see payback in 6 to 18 months. The largest wins come from scrap cuts and higher uptime. That is why a solid vacuum cup high frequency annealing machine is a smart move.
Sustainability and compliance
Induction anneal is clean. There is no open flame. You heat only the metal you need. This cuts energy use and lowers HVAC load.
Noise is low. Emissions are near zero at the point of use. You also cut pickling and re-polish steps if you protect the surface. A vacuum cup high frequency annealing machine helps you meet safety and energy rules with less work.
Log your runs and checks. Keep a clear maintenance record. This supports audits and customer reviews.
Frequently Asked Questions of vacuum cup high frequency annealing machine
What metals can it process?
Most lines use 304 or 316 stainless steel. It can also treat 201 and some low-carbon steels with tuned recipes.
Will it change the look of my cup?
If tuned well, color change is slight. Gas shielding and short heat time preserve the finish.
How do I set the right frequency?
Match frequency to wall thickness and heat depth. Thin walls do best with higher frequency for shallow, even heat.
Do I need shielding gas?
Not always. Gas helps reduce tint and scale. It is helpful for bright finishes and mirror polish parts.
How much power do I need?
It depends on cup size, wall, and speed. Many cup lines run units from 15 to 60 kW for rim and neck work.
Can it integrate with robots?
Yes. Most systems offer I/O, fieldbus links, and PLC hooks. Recipe calls and part sensing are standard.
What maintenance is critical?
Keep water clean and flowing, and inspect the coil often. Clean the pyrometer lens and check all fasteners.
Conclusion
A well-tuned vacuum cup high frequency annealing machine can lift quality, speed, and yield in one move. It gives you focused heat, less warp, and fewer cracks. It also fits cleanly into modern, data-driven lines.
If you build drinkware at scale, start with a coil trial and a clear recipe window. Train your team, lock your settings, and track your gains. Ready to go deeper? Subscribe for new guides, or leave a comment with your setup and goals.