Grease, flour, fill with 4–5 cups batter, bake 325–350°F for 35–40 minutes.
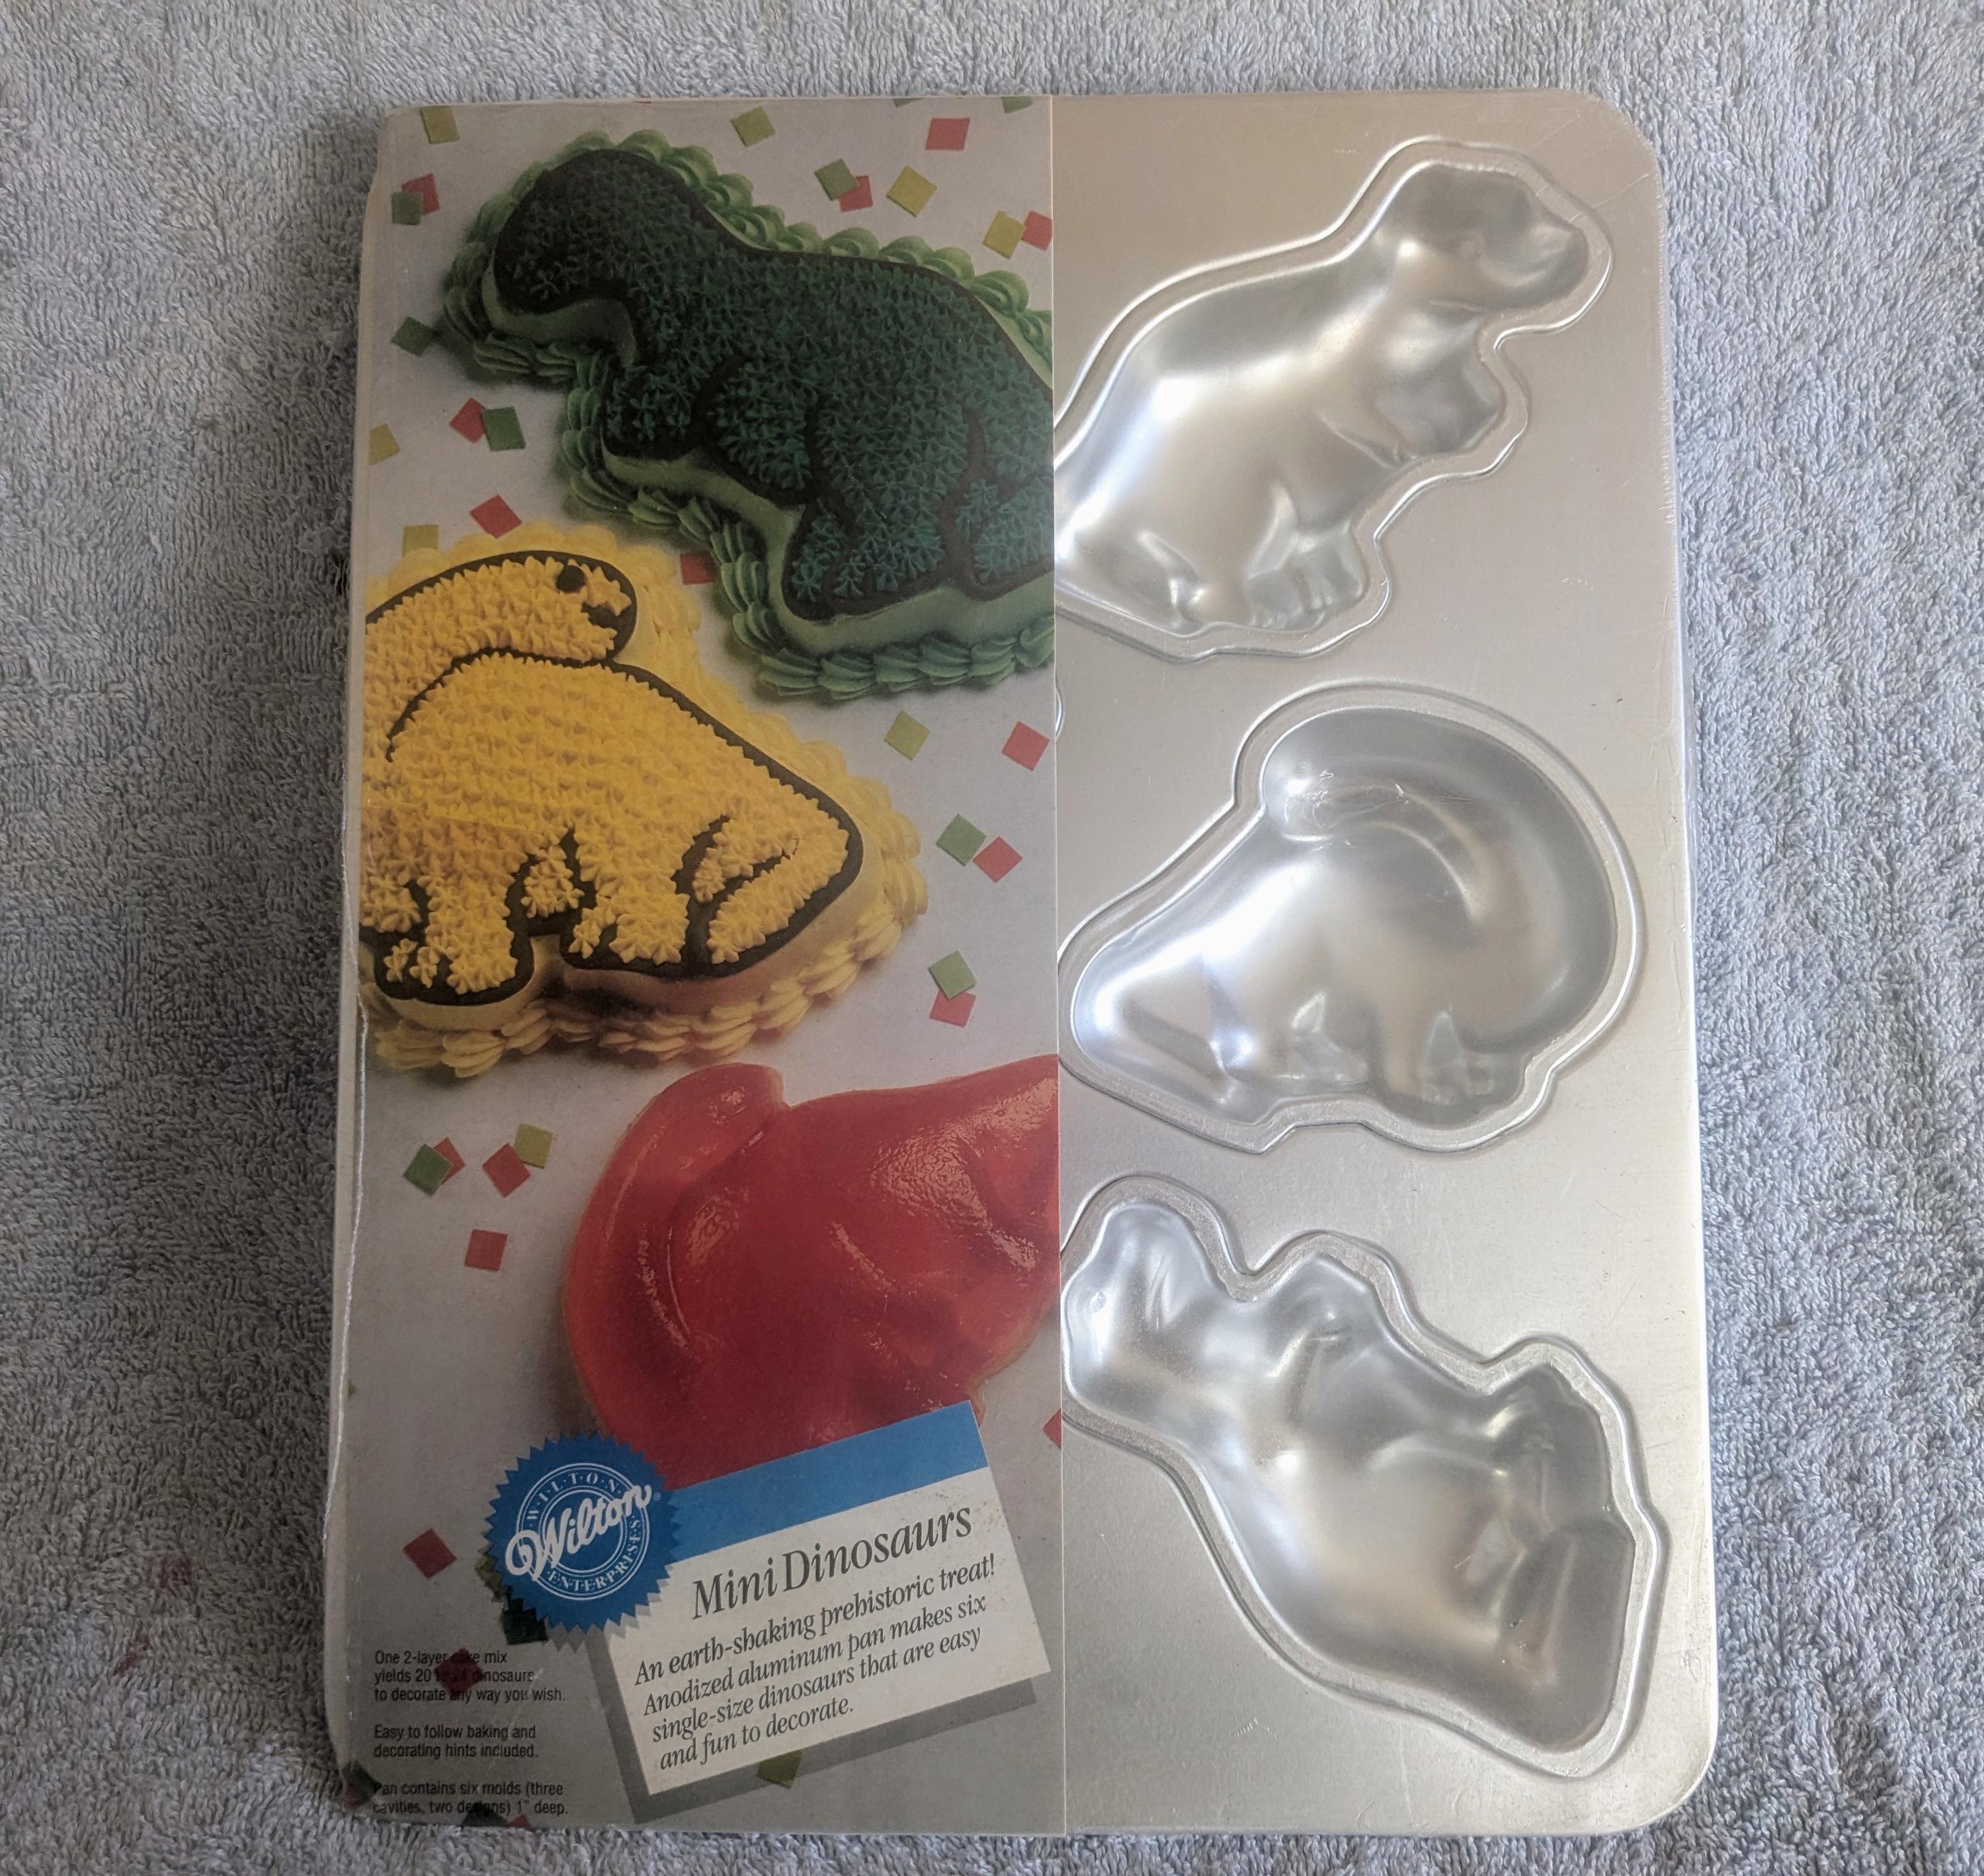
If you found a vintage Wilton Partysaurus pan and want perfect results the first time, you’re in the right place. I’ve baked and decorated dozens of shaped cakes, and I’ll walk you through wilton partysaurus cake pan instructions with clear steps, pro tips, and simple fixes that work in real kitchens.

What You Need for the Wilton Partysaurus Cake Pan
Gather tools and ingredients before you start. This keeps the process fast and stress-free, and it is the heart of well-planned wilton partysaurus cake pan instructions.
Tools
- Wilton Partysaurus cake pan, clean and dry
- Pastry brush or paper towel for greasing
- Cooling rack and 10–12 inch cake board
- Mixing bowls, hand mixer or stand mixer
- Offset spatula and serrated knife
- Toothpicks for marking design lines
- Piping bags and couplers
- Tips: #3 or #4 (outline), #16 or #18 (stars), #352 (leaves or spikes), #21 (borders)
- Optional: flower nail for even baking, bake-even strips, kitchen scale
Ingredients
- 4 to 5 cups batter total (one standard cake mix or a sturdy scratch recipe)
- Solid vegetable shortening and flour, or pan-release paste
- Buttercream icing, medium-stiff consistency (about 5–6 cups)
- Gel food colors: greens, yellow, orange, purple, black, white
- A little corn syrup or piping gel for shine (optional)
- Simple syrup for brushing if the cake seems dry (optional)

Pan Prep That Prevents Sticking
Great decorating starts with a clean release. These wilton partysaurus cake pan instructions begin with proper prep.
- Wash and dry the pan well. Any residue can cause sticking.
- Grease every groove with solid shortening. Use a brush to reach small details.
- Dust with flour. Tap and turn the pan to coat, then tap out the extra.
- If you use pan-release paste, brush it on thin and even.
- Do not line with parchment. Shaped details need direct contact to bake sharp.
Personal tip: I brush the pan, chill it 5 minutes, then brush a second light coat in the deepest spots. It works like a seatbelt for details.

Batter, Filling, and Oven Settings
Even baking is simple if you match batter volume, oven temp, and pan type. Here are the core wilton partysaurus cake pan instructions for the bake itself.
- Volume: Aim for 4 to 5 cups of batter. That is one standard cake mix.
- Batter style: Choose a sturdy mix. Pound cake or doctored mix holds details well.
- Fill level: Fill the pan a bit over halfway, about two-thirds full.
- Temperature: Bake at 350°F for shiny aluminum pans. Bake at 325°F for dark nonstick.
- Rack: Middle rack. Preheat for at least 15 minutes before baking.
- Even bake: Place a greased, inverted flower nail in the center as a mini heat core.
Bake time guide: 30 to 40 minutes. Check at 25 minutes. The cake is done when it springs back, a toothpick tests clean, and the center reads about 200–210°F.

Step-by-Step Baking Guide
Follow this simple path for reliable results. These wilton partysaurus cake pan instructions keep your timeline tight and calm.
- Preheat the oven and prep the pan as noted above.
- Mix your batter just until combined. Do not overmix.
- Fill the pan two-thirds full. Smooth the top with an offset spatula.
- Tap the pan on the counter to pop big air bubbles.
- Bake on the middle rack. Avoid opening the door early.
- Rotate the pan once at the 20–25 minute mark if your oven bakes unevenly.
- Test doneness with a toothpick or thermometer.
- Remove to a rack. Cool in the pan for 10–15 minutes.
- Loosen edges with a small spatula or plastic knife.
- Invert onto a rack lined with a cake board. Lift the pan straight up.
Pro move: If the belly or tail lags behind, tent that area with a small sheet of foil in the last 10 minutes.

Releasing, Leveling, and Cooling Without Cracks
Release and cooling are where many shaped cakes crack. This part of wilton partysaurus cake pan instructions matters a lot.
- Wait 10–15 minutes before unmolding. Too hot and it tears. Too cool and it sticks.
- If a small bit clings, use a spatula through the pan’s back side to nudge it loose.
- Level the back if needed. Use a serrated knife and a gentle sawing motion.
- Wrap the warm cake in plastic once it is cool to the touch. Chill 1–2 hours. Firm cake is easier to decorate and crumbs stay put.
If a small chip breaks, save it. You can “glue” it with buttercream later.

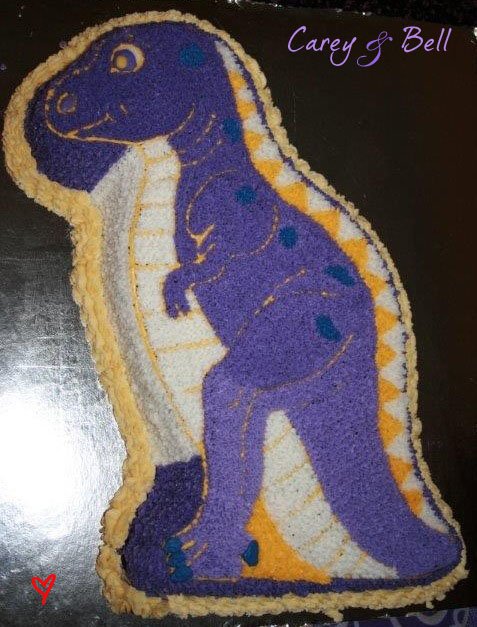
Decorating the Partysaurus: Colors, Tips, and Piping Order
Star-fill decorating is simple and fun. This is the most-loved part of wilton partysaurus cake pan instructions.
Icing consistency
- Use medium-stiff buttercream. It should hold a clean star point and not slump.
- Keep a damp towel over your bowl so the icing does not crust too soon.
Colors and tools
- Body: green tones
- Belly or accents: lighter green or yellow
- Hat and party details: bright colors like purple, orange, and yellow
- Eyes and outline: white and black
- Tips: #16 or #18 for stars, #3 or #4 for lines, #352 for spikes or leaves, #21 for borders
Piping order
- Mark features. Use a toothpick to trace lines for eyes, mouth, hat, spots.
- Outline key shapes with tip #3 or #4. Thin lines guide your stars.
- Fill the largest area first (body) with star tip #16. Pack stars snug with no gaps.
- Add belly, spots, hat, and party bits in bright colors.
- Pipe eyes, pupils, and smile last. Add small highlights for life.
- Finish borders on the base board with a shell or rope using tip #21.
Personal tip: For sharp detail, let each section crust 5–10 minutes before piping the line next to it. This keeps colors from smudging.

Pro Tips From My Kitchen
These lessons come from real wins and fails. I learned them the hard way so you do not have to. They boost the success of any wilton partysaurus cake pan instructions.
- Use a scale to split batter if you test flavors. Even weight means even height.
- If your oven runs hot, bake at 325°F and extend time a bit.
- A flower nail helps the center bake. Grease it so it slides out clean.
- For super clean stars, chill the cake 20 minutes before decorating.
- If black or red icing tastes bitter, switch to gel brands made for deep colors and add a tiny bit of cocoa to tone the taste.
- Keep paper towels and a toothpick nearby. Lift stray crumbs. Fix tiny gaps.
Common mistake to avoid: Nonstick spray alone can create bare spots. Use solid shortening plus flour or a proven pan-release paste.
Storage, Serving, and Transport
Plan for where the cake will live after you finish. Smart storage is part of complete wilton partysaurus cake pan instructions.
- Room temp: Up to 24 hours in a cool, dry spot, covered.
- Refrigerate: 3–4 days, boxed. Bring to room temp before serving.
- Freeze: Wrap undecorated layers up to 2 months. Thaw in the fridge, then frost.
- Transport: Place on a thick board. Set the box on a non-slip mat in the car. Keep it cool and out of sun.
- Servings: The Partysaurus pan serves about 12–15 party slices, or more if you cut small.
Troubleshooting: What If Something Goes Wrong?
Even careful bakers hit bumps. These fixes round out practical wilton partysaurus cake pan instructions.
- Stuck cake: Warm the pan base with a hot towel for 1–2 minutes, then try again. Next time, double-check grease in deep grooves.
- Cracks: “Glue” with buttercream. Chill 10 minutes, then star-fill to hide.
- Dry cake: Brush the back with light simple syrup. Let it soak, then decorate.
- Color bleed: Use gel colors, not liquid. Let sections crust before adding a dark outline.
- Soft stars: Icing is too thin or warm. Add a spoon of powdered sugar and chill the bag 5 minutes.
Frequently Asked Questions of wilton partysaurus cake pan instructions
How much batter does the Wilton Partysaurus pan need?
It holds about 4 to 5 cups of batter. One standard cake mix is perfect for these wilton partysaurus cake pan instructions.
What temperature should I use and for how long?
Bake at 350°F for shiny aluminum pans, or 325°F for dark nonstick. Time ranges from 30 to 40 minutes; start checking at 25.
Can I use a boxed cake mix?
Yes, it works great. For sharper details, use a pound cake mix or add a pudding mix to standard batter as part of your wilton partysaurus cake pan instructions.
How do I keep the cake from sticking?
Grease with solid shortening and flour every detail, then tap out the extra. Let the cake rest 10–15 minutes before unmolding.
Which piping tips do I need for the design?
You can do most of it with star tip #16 and round tip #3. A leaf tip #352 adds nice spikes or accents.
Can I bake and decorate ahead?
Yes. Bake a day ahead and wrap well, or freeze the layer for up to two months. Decorate the day of or the day before serving for best texture.
How do I get clean outlines and features?
Trace guides with a toothpick, then pipe thin lines with tip #3. Let areas crust before outlining to avoid smears.
Conclusion
With the right prep, steady heat, and a simple star-fill plan, your Partysaurus will look bold, cute, and party-ready. Follow these wilton partysaurus cake pan instructions step by step, and you will get clean details, bright colors, and a smooth release every time.
Ready to bake your dino star? Gather your tools, set your oven, and start piping. Share your results, ask questions, or subscribe for more vintage-pan guides and decorating tips.