The WantJoin cup sealing machine manual shows you how to set up, seal, and fix common issues.
If you want fast, tidy seals for boba, juice, or iced coffee, you’re in the right place. I’ve set up, tested, and trained teams on these sealers. In this guide, I break down the wantjoin cup sealing machine manual in plain English, with clear steps and tips you can use today. Stick around to learn how to install, dial in, maintain, and troubleshoot like a pro.
What Is the WantJoin Cup Sealing Machine and Who It’s For
The wantjoin cup sealing machine manual covers a countertop heat sealer for plastic film lids. It is built for boba shops, smoothie bars, cafes, and food trucks. It also works well for small batch use at home or events. The goal is a clean, leak-free seal in seconds. The wantjoin cup sealing machine manual helps you get that result on day one.

Unboxing and Parts Overview of the WantJoin Cup Sealing Machine Manual
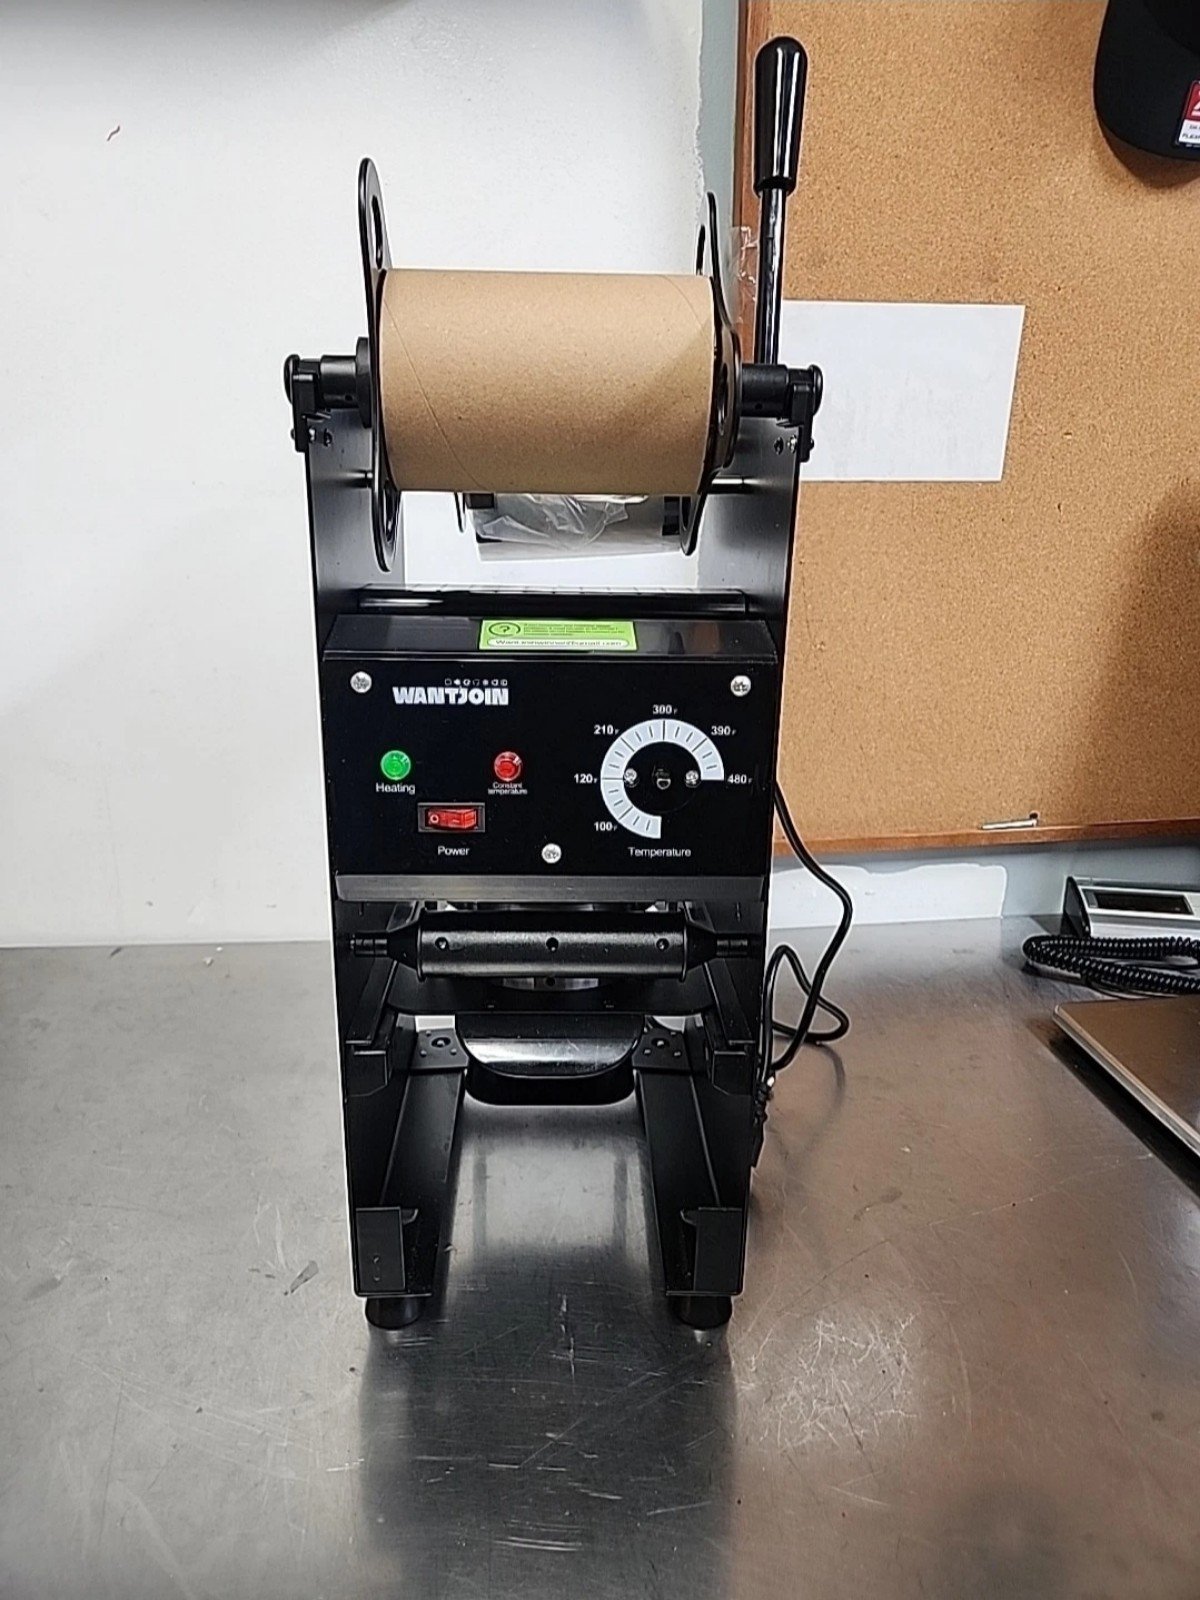
The wantjoin cup sealing machine manual walks you through the box contents. Most units include the main body, handle or lever, control panel, cup ring, film rod and brackets, cutter, and drip tray. You may also find spare fuses and a simple tool. Note that parts can vary by model, so check your manual pages.
Key parts to know:
- Control panel for temperature and timers
- Cup holder or ring sized for your cup
- Film roll rod and side brackets
- Film guide path, alignment marks, and cutter
- Heating head or plate that seals the film
- Power switch and fuse access
I always lay the parts out on a clean table. Then I match each part with the image in the wantjoin cup sealing machine manual before I power up.

Step-by-Step Setup Guide (Manual WantJoin Cup Sealer)
The wantjoin cup sealing machine manual gives a simple setup flow. Here is a streamlined version that works on most WantJoin models.
- Place the machine on a level, heat-safe surface. Leave a few inches for airflow.
- Check voltage and plug type. Use a grounded outlet with the right rating.
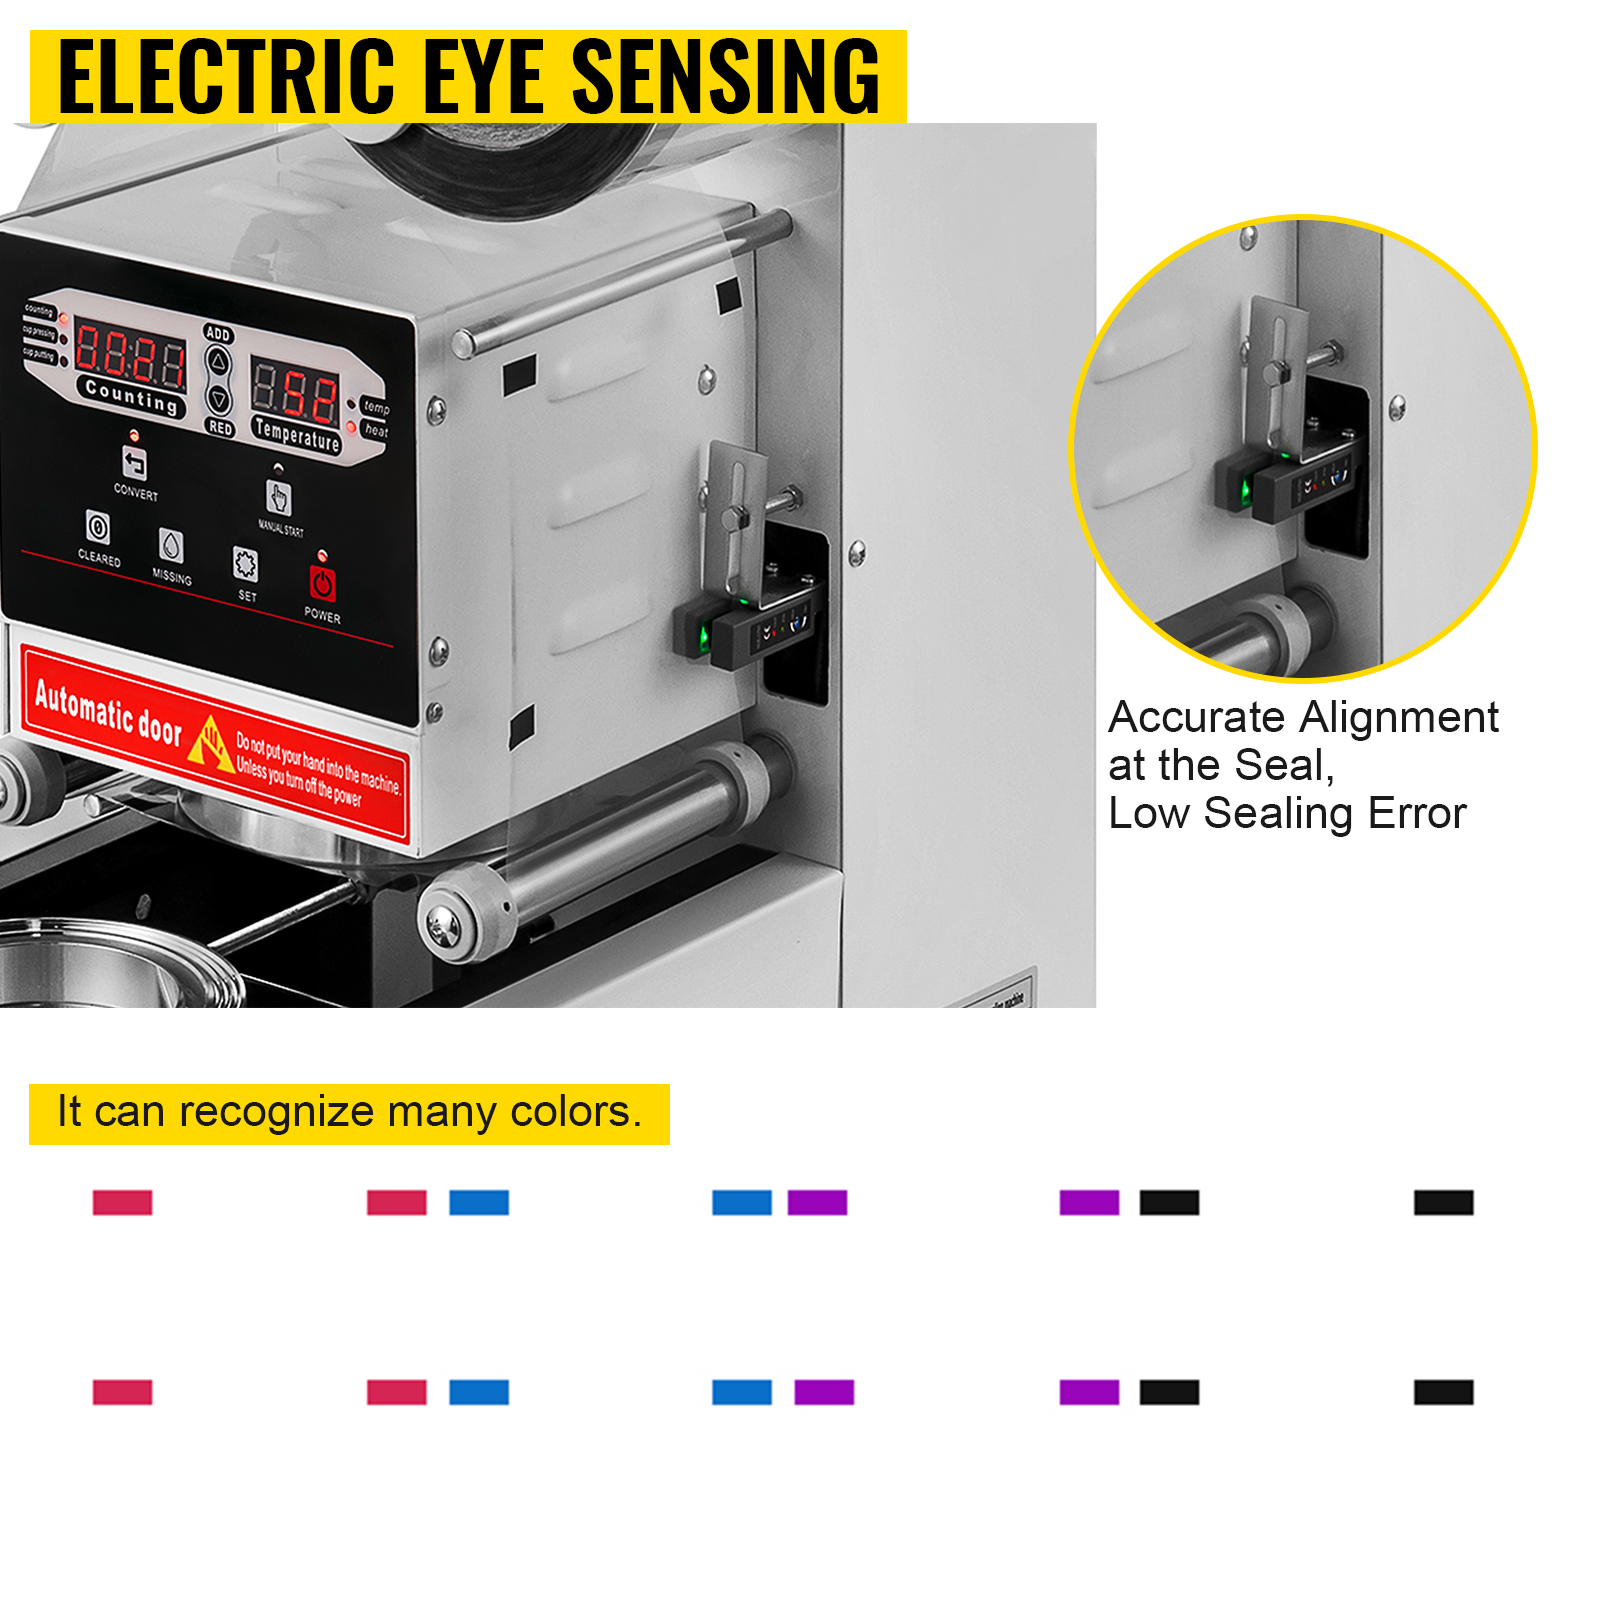
- Install the film roll. The print side should face the cup, not the heater plate.
- Thread the film through the guide path. Follow the arrows in the wantjoin cup sealing machine manual.
- Pull the film across the sealing area. Leave a small slack so it moves smooth.
- Set the target temperature. Many films start at 160–180°C. Start low and adjust as needed.
- Warm up for 5–10 minutes. The machine needs time to reach a stable heat.
- Test with an empty cup. Cycle the lever to check alignment and film feed.
If the film drifts or pulls, re-thread it. On my first try, I had the print side backwards. The seal failed. A quick flip fixed it. The wantjoin cup sealing machine manual notes this common mistake.

How to Use the WantJoin Cup Sealing Machine Manual for Perfect Seals
The wantjoin cup sealing machine manual breaks the cycle into a few simple steps.
- Fill the cup below the rim. Leave 5–8 mm headspace to avoid spills.
- Wipe the rim dry. Any liquid on the rim can cause a weak seal.
- Place the cup in the ring. Make sure it sits flat.
- Slide or pull the handle to move the film over the cup.
- Press the lever or start the cycle. Hold steady until the light or beep.
- Lift and check the edge. Look for a smooth, even ring with no gaps.
Pro tip: If you see wrinkles, the film is too loose or too hot. If the lid peels off, the heat is too low or the cup is wet. The wantjoin cup sealing machine manual suggests small changes, one at a time.

Film Types, Cup Sizes, and Temperature Settings
The wantjoin cup sealing machine manual covers common films and cups. PET and PP films are popular. Many boba cups are PP, which likes higher heat. PET cups often seal at a slightly lower heat. Paper cups with PE lining also work, but you need good pressure and heat.
Use these starting points:
- PP cup with PP film: 170–190°C
- PET cup with PET film: 160–175°C
- Paper cup with PE lined film: 175–185°C
Match cup size to the ring. Standard sizes include 90, 95, and 98 mm. If your ring does not match the cup, the seal may be off-center. The wantjoin cup sealing machine manual usually lists ring sizes and any adapters you can add.

Troubleshooting Guide for WantJoin Cup Sealing Machine Manual
When things go wrong, the wantjoin cup sealing machine manual offers fixes. These are the most common issues I see, with fast checks you can do now.
-
Seal peels off too easy
- Raise temperature by 5–10°C.
- Dry the rim and reduce fill level.
-
Wrinkles across the lid
- Lower temperature by 5–10°C.
- Tighten the film feed or re-thread it.
-
Partial seal or gaps
- Center the cup in the ring.
- Check for debris on the heater plate.
- Increase dwell time if your model allows.
-
Burn marks or warped lids
- Lower heat and shorten the dwell.
- Check that film type matches the cup.
-
Film will not advance
- Re-thread per the wantjoin cup sealing machine manual path.
- Check the cutter blade for burrs.
- Make sure the roll is not too tight on the rod.
When in doubt, return to baseline. Set heat to a known good range, re-thread the film, and test with a plain water cup. I log each change. Small steps win.
Cleaning and Maintenance Checklist
A clean machine seals better and lasts longer. The wantjoin cup sealing machine manual suggests a daily and weekly routine. Here is a simple plan that works.
- Turn off and unplug. Let it cool.
- Wipe the heater plate with a soft, damp cloth.
- Clean the cup ring and tray. Remove syrup and tea stains.
- Check the film path for sticky spots.
Weekly:
- Inspect the power cord and plug.
- Check screws and brackets for tightness.
- Clean the cutter and guide rollers.
- Test the fuse and keep a spare.
Never scrape the heater plate with metal. It will scratch the surface and hurt the seal. I use a soft cloth and a little warm water. The wantjoin cup sealing machine manual also warns against harsh chemicals.

Safety, Compliance, and Best Practices
Heat and motion need care. The wantjoin cup sealing machine manual covers key safety notes. Keep hands clear of the heater and moving parts. Do not leave the machine on when not in use. Use gloves when cleaning a warm plate.
Best practices I teach to teams:
- Train new staff with water first, not hot drinks.
- Keep film rolls in a cool, dry place.
- Use cups that match your ring size.
- Label settings for each film brand you use.
If you run a shop, set a maintenance log. It builds a record and helps with audits. The wantjoin cup sealing machine manual often includes a safety page. Post it near the station.
Pro Tips from Real-World Use
After many shifts with these sealers, I’ve picked up a few habits. The wantjoin cup sealing machine manual gives you the base. These tips push your results a bit higher.
- Warm-up timer: Set a 10-minute timer at start of day. Stable heat equals stable seals.
- Film orientation: Draw a small arrow on the core to show the print side. It stops mistakes.
- Flavor guard: Wipe sticky rims fast. Sugar burns on plates and causes weak spots.
- Seasonal tweak: Raise heat 5°C on cold days. Drop it 5°C on hot days. Ambient temp matters.
- Batch labeling: Keep a simple card with film brand, cup brand, and the temperature that works. This beats guesswork during rush.
These are small wins that add up. The wantjoin cup sealing machine manual is your baseline, and your notes are the extra edge.
Cost of Ownership and Value: Is It Worth It?
The wantjoin cup sealing machine manual often comes with an affordable unit. For most small shops, the payback is quick. You cut spill rates, boost speed, and improve the guest experience. Films are cheap per lid. Downtime drops with good care.
Watch for:
- Power draw in long shifts
- Cost of films by brand and thickness
- Spare parts like fuses and cutters
- Time spent on training and cleaning
If you follow the wantjoin cup sealing machine manual and stick to the care plan, the machine should serve you well. For home or pop-ups, it is simple to move and store.
Frequently Asked Questions of wantjoin cup sealing machine manual
How long does warm-up take?
Most units need 5–10 minutes to reach set heat. The wantjoin cup sealing machine manual suggests waiting for the ready light before sealing.
Can I seal paper cups?
Yes, many paper cups with PE lining seal well. Use a bit more heat and make sure pressure is even.
Why does my film keep drifting?
It is often threaded wrong or too loose. Re-thread it per the wantjoin cup sealing machine manual and keep the roll level.
What temperature should I start with?
Start at 170°C for PP and 165°C for PET. Run test seals and adjust in 5°C steps.
Do I need special cups?
Use cups that match the ring size and film type. The wantjoin cup sealing machine manual lists compatible sizes and any adapters.
How do I stop leaks on fruit chunks or toppings?
Leave more headspace and dry the rim well. If needed, add 5°C and a touch more dwell time.
Can I clean the heater plate with alcohol?
Use a soft cloth with warm water first. If needed, a small amount of food-safe cleaner is fine; avoid harsh solvents.
Conclusion
You now have a complete path to set up, use, and care for your sealer. Follow the wantjoin cup sealing machine manual for the basics, then add the tips here to lock in clean, fast, and strong seals. Start with test cups, take small steps, and log what works.
Ready to dial in your station? Try the setup steps today, note your best settings, and share your results. If you found this helpful, subscribe for more hands-on guides or drop a question in the comments.