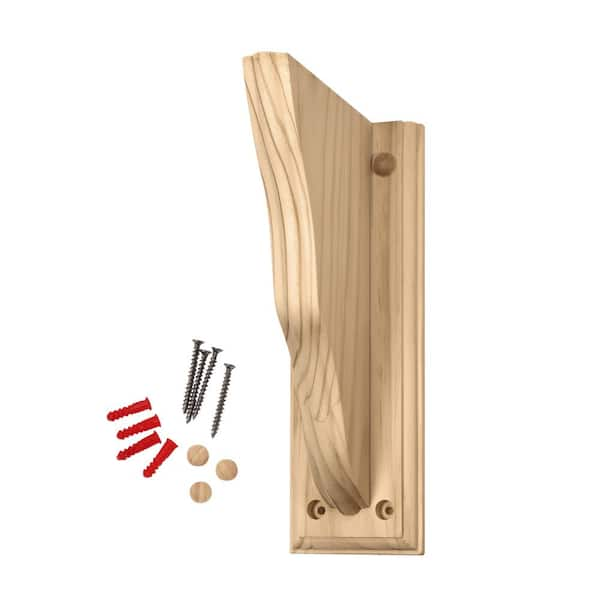
A wood bracket keyhole mounting plate is a slim, hidden hanger for shelves.
If you want strong, clean, and invisible mounting, you need to know how a wood bracket keyhole mounting plate works. I have used this hardware on shelves, corbels, and art frames for years. In this guide, I will show you how to pick, install, and trust a wood bracket keyhole mounting plate like a pro. Stick with me, and you will avoid loose mounts, stripped screws, and guesswork.
What is a wood bracket keyhole mounting plate?
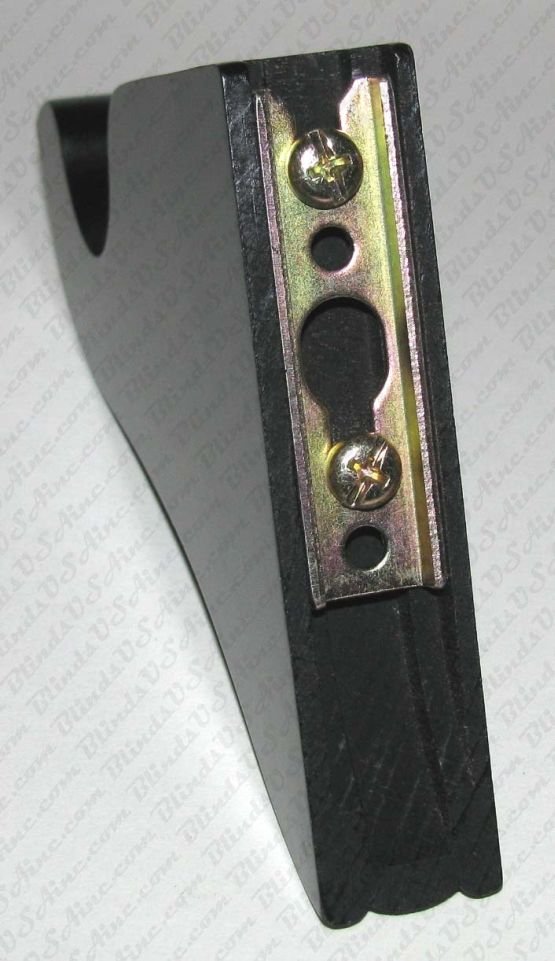
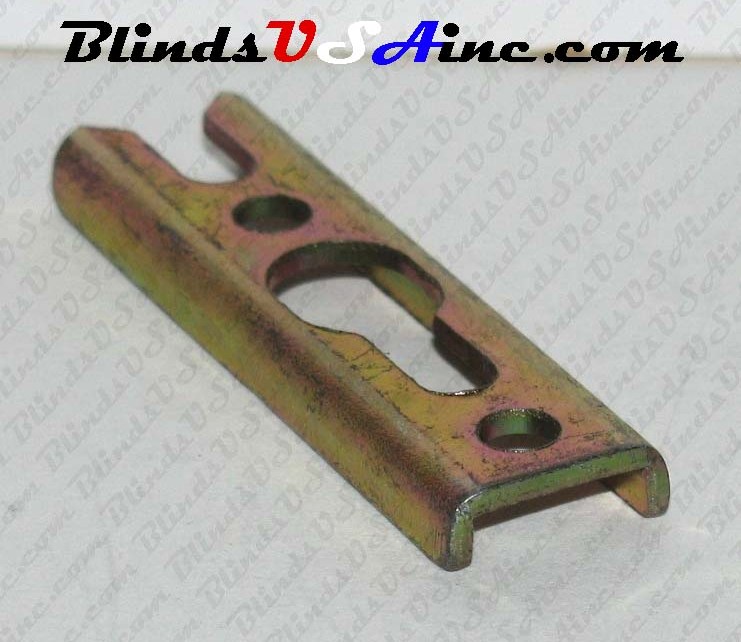
A wood bracket keyhole mounting plate is a small metal plate that lets a bracket, shelf, or frame hang on a screw head. It has a keyhole shape. The wide end slips over the screw head. Then the piece slides down into a narrow slot to lock in place.
The plate hides inside the wood or sits on the back. That gives a floating look with no bulky hardware in sight. The wood bracket keyhole mounting plate is common in woodworking, home décor, and retail displays.
You can find it in many sizes and metals. Most plates use steel with zinc or black finish. Some are stainless for wet spots.

How it works: mechanics and load path
The screw in the wall takes the load in shear. The plate on the wood traps the screw head so the piece cannot pull forward. The long slot gives a little side-to-side play to help you level the piece.
Strength comes from three parts. The wall anchor or stud holds the screw. The screw head supports the plate. The plate spreads the force into the wood. Done right, the wood bracket keyhole mounting plate feels solid and clean.

Types, materials, and finishes
You will see a few common styles.
- Recessed plates sit in a shallow mortise. They are flush and fully hidden.
- Surface plates screw to the back. They are fast to fit and easy to swap.
- Slotted plates give left-right adjust. They help you hit studs and keep level.
- Fixed-hole plates are tiny and neat. Use them on small frames and craft work.
Materials and finishes vary.
- Zinc-plated steel resists rust for most indoor use.
- Stainless steel fights moisture in baths and kitchens.
- Black oxide looks sleek on dark wood.
- Brass blends well with warm woods and classic décor.
Source: sawdust2stitches.com
Choosing the right size and load rating
Pick a plate that matches your piece, wall type, and use.
- Light frames and signs can use a small plate with one screw.
- Shelves, corbels, or speaker mounts should use two plates and two screws.
- For drywall, aim for studs. Use anchors only when you must.
- Longer screws bite deeper. That boosts pull-out strength.
- Use plates with thicker steel for heavy loads. Thicker plates flex less.
I like to test a wood bracket keyhole mounting plate on a scrap piece first. I load it with weight and give it a shake. If it creaks or shifts, I step up to a bigger plate, longer screws, or a stud mount.
 supplies you need”
style=”max-width: 100%; height: auto; border: 2px solid black; border-radius: 10px; display: block; margin: 0 auto;”
loading=”lazy”
/>
Tools and supplies you need
Here is a short kit that has never failed me.
- Drill and driver with clutch to avoid overdrive.
- Bits for pilot holes and mortising.
- Forstner or router for recessed plates.
- Stud finder, level, and tape.
- Painter’s tape and pencil for clean marks.
- Screws and anchors matched to wall type.
- Two wood bracket keyhole mounting plate sets for wider shelves.
Source: homedepot.com
Step-by-step installation guide
Follow these steps for a clean and safe mount.
- Plan your layout
- Mark stud locations first.
- Mark plate centers on the back of the wood piece.
- Cut the recess if needed
- Use a Forstner bit or a small router to make a shallow pocket.
- Test fit the plate so it sits flush without wobble.
- Attach the plates
- Pre-drill pilot holes to avoid splits.
- Drive screws snug, not stripped. The plate must not rock.
- Set wall screws
- Transfer your marks to the wall with a level.
- Drill for anchors if no stud is present.
- Leave screw heads proud by about the lip depth of the plate.
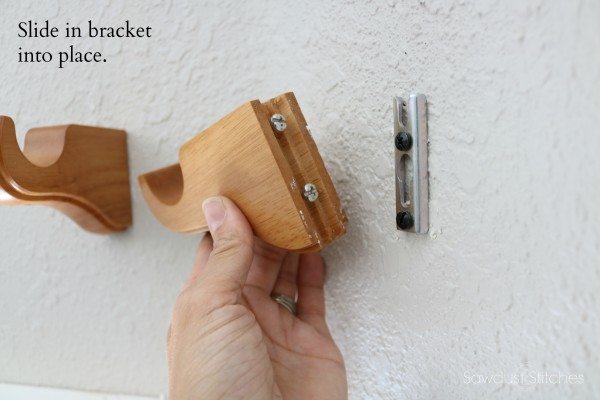
- Hang and adjust
- Hook the wide hole over the screw head.
- Slide down into the keyhole slot.
- Nudge for level. Tighten wall screws if needed.
- Final safety check
- Load the shelf gently first.
- Listen for creaks. Check for movement and re-tighten.
A good wood bracket keyhole mounting plate feels secure with no rattle and no tilt.

Safety, code, and best practices
Safety comes from good anchors, sound wood, and the right screws. Follow anchor ratings as guides, not promises. Real walls vary. Studs beat anchors every time.
Keep edge distances in mind. Do not put screws too close to wood edges. Avoid split-prone woods without pilot holes. When in doubt, add a second plate or a center support. A wood bracket keyhole mounting plate is strong, but your wall and screws must match the job.
Common mistakes and how to fix them
Learn from the hard lessons I have seen on site.
-
Screws too short
They pull out of drywall. Fix by using studs or stronger anchors. -
Plate not flush
The wood rocks on the plate. Fix by deepening the mortise or shifting to a surface mount plate. -
Misaligned screws
The plate will not seat. Fix by widening the slot slightly or re-setting the wall screw. -
Over-tight screws
They strip and weaken the hold. Fix by using the drill clutch and proper pilot holes. -
One plate on a long shelf
It twists under load. Fix by adding a second wood bracket keyhole mounting plate.
Source: thecurtainrodshop.com
Design ideas and use cases
This hardware shines when you want clean lines with easy removal.
- Floating spice shelves in a small kitchen.
- Corbels under a mantle where brackets must vanish.
- Entryway racks with hidden mounts behind a board.
- Acoustic panels and art frames for a gallery look.
- Small Bluetooth speaker shelves where cords and mounts stay hidden.
I like to pre-route recesses in a jig. That speeds repeat builds and keeps each wood bracket keyhole mounting plate in the same spot.
Maintenance and inspection
A quick check once a season goes far.
- Check for wobble and re-tighten wall screws.
- Look for wall damage from moisture or impact.
- For wood that moves with seasons, keep a tiny gap so the plate does not bind.
- Replace cheap anchors that spin or crush.
If a wood bracket keyhole mounting plate shows rust or bend, swap it out. Plates are cheap. Repairs to walls and art are not.
Troubleshooting loose or misaligned mounts
If the mount sags, first check the wall screws. Tighten them a quarter turn. If it still sags, pull it down and verify both plates sit to the same depth.
If the piece rocks, the plate is not flush. Deepen the recess or add a thin shim behind the other plate. If the slot will not catch, back the screw out one turn so the head can seat in the wide part of the keyhole. A careful reset brings a wood bracket keyhole mounting plate back to full strength fast.
Cost, brands, and sourcing tips
You can find plates at hardware stores, woodworking shops, and online. Expect to pay a few dollars for a pair, more for stainless or heavy duty sets. Buy extra screws that match the plate holes and your wall type.
Look for thicker steel and clean stamping. Sharp burrs can cut or catch. If you use the wood bracket keyhole mounting plate for heavy shelves, buy from a pro-grade line and keep your batch the same across a project. That keeps hole shapes and offsets consistent.
Frequently Asked Questions of wood bracket keyhole mounting plate
How much weight can a keyhole plate hold?
It depends on the wall, the anchor, and the screw. When in doubt, use studs, longer screws, and two plates to spread load.
Can I use it on drywall without studs?
Yes, but use rated anchors and follow the anchor limits. Two anchors and two plates give better safety and less tilt.
Do I need to recess the plate?
No. Surface mount plates work fine. Recessed plates look cleaner and reduce rocking on the wall.
What screw head works best?
Use pan or truss heads with a broad rim. Avoid countersunk heads because they can slip through the keyhole.
How do I keep it level?
Use a level to set your wall screws. Slotted plates help with final tweaks before you tighten the screws.
Can I remove the shelf easily?
Yes. Lift the piece to clear the narrow slot, then pull out. That is one big perk of this hardware.
Conclusion
A clean, strong, and hidden mount is easy when you match the plate, wall, and screws. Plan the layout, hit studs when you can, and test the fit before you load the piece. A smart setup with a wood bracket keyhole mounting plate gives you pro results with little fuss.
Try one small project this week. Fit a simple shelf or frame using the steps above. Share your result, ask a question, or subscribe for more build guides and shop tips.